Best RV Solar Panel Kits
Compare the best RV solar panel kits for 2018.
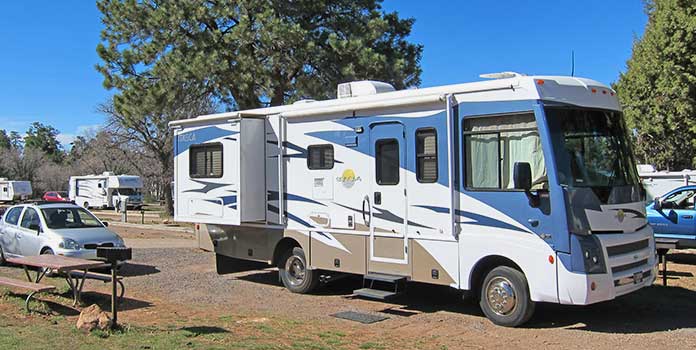
For RV dwellers, finding the best RV solar panel kits makes a lot of sense. They’re more affordable every year. They’re easy to incorporate into your RV. They produce clean, free electricity. And they let you leave that loud, dirty generator at home. RV solar kits – premade kits that include all the equipment you need to start running off the sun – make the buying and installation process easy, but how do you go about choosing the right one? Let’s take a look at the best RV solar panel kits for 2018, as well as what components are typically included in these kits and how to choose the right one for you!
Best RV Solar Panel Kits of 2018
Below are our top picks for the best RV solar panel kits of 2018. Of course, there are certainly other fine kits out there than the ones below, but these stuck out thanks to their price, equipment, and unique features. All of the kits below, save one, use high-efficiency monocrystalline solar panels, which typically produce more electricity than a similarly-sized polycrystalline panel, which are generally cheaper. Thanks to this solar technology, you’ll be getting a bit more umph from your solar installation than you would with poly solar panels.
Most of these kits include the panel, charge controller, and wiring (from the panel to the controller, and – depending on the kit – from the controller to the battery). If you’re looking for the easiest set-up, one below includes an inverter as well. Below you’ll find hard-sided solar panels designed for permanent attachment to your roof, as well as portable options that you’ll store while driving. The wattage for each kit ranges from 100 to 160 watts, though you can likely purchase an additional panel if needed – just be sure the included controller and wiring can handle the combined amperage of the solar panels (though since most kits include a 20 or 30 amp controller, you should be good for an additional panel or 2). For each kit below, we’ve noted the panel type, wattage, the included components, and what makes it special, as well as our overall thoughts. Let’s get to it!
Best Low Cost RV Solar Panel Kit
Windy Nation 100 Watt Solar Panel Kit
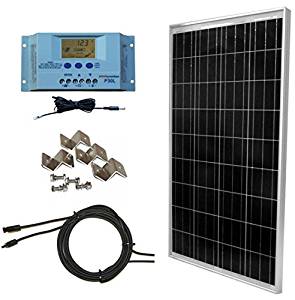

- Panel type: rooftop polycrystallline
- Available sizes: 100 watts
- Includes: Panel, charge controller, mounting hardware, wiring (panel to controller), temperature sensor
If you’re looking to spend as little money as possible on your solar panel kit, check out Windy Nation’s bare-bones 100 Watt Solar Panel Kit. If you’re okay with buying some additional equipment like wires and fuses, this little kit offers pretty good bang for the buck.
The rigid polycrystalline solar panel comes with mounting hardware to attach to your roof, as well as the wiring to connect to the charge controller. However, the kit doesn’t come with any wiring to connect to the battery, and you’ll need to buy fuses as well. Thankfully, the included instructions give direction on finding the right wire and fuse sizes.
Despite the low cost, the PWM charge controller is far from the most basic one can find. The LCD screen shows system amperage, voltage, temperature, and load draw – capabilities not included on the cheapest controllers. And with a 30 amp controller, you’ve got room to add 3 more 100 watt panels. The controller even comes with a temperature sensor for the battery – a bonus other kits below don’t include.
Lastly, if you’re looking to purchase a battery as well, you can tack on a 100Ah AGM battery to your kit. Customers note that the equipment included is high-quality and seems to hold up well – just don’t forget to buy those additional required wires and fuses!
Best All-In-One RV Solar Panel Kit
Go Power Weekender
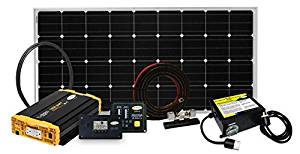
- Panel type: Rooftop monocrystalline
- Available Sizes: 160 watts
- Includes: Panel, inverter (with remote), transfer switch, MPPT charge controller, mounting hardware, wiring (panel to controller, controller to battery), fuses
If you’re looking for something a bit more robust than the Windy Nation kit above, check out Go Power’s Weekender Kit. Beyond the battery, this comprehensive kit has pretty much every piece of equipment you need to go solar.
Like the Windy Nation kit above, this kit includes the panel (bumping up to 160 watts instead of 100), mounting equipment, and wiring, but also includes an MPPT charge controller (30 amp), the inverter, transfer switch (to go between shore power and solar power), battery wiring, and fuses.
If you’re looking for ease in your purchasing experience, you can’t get easier than this. Tack on a battery and you’re completely set up!
However, there are a few downsides. First off, this kit costs quite a bit more than others on our list. Sure, it includes almost everything you need, but it’s 3x to 4x more expensive than others here. However, with that high cost you’re getting decent quality equipment, including a high output monocrystalline solar panel, MPPT charge controller for better production in poor weather, and a premium pure sine wave inverter with remote.
While there aren’t too many customers reviews (probably do to the high cost), what’s there is very positive. Buyers report excellent customer service and quality equipment that works well.
If you’re looking for the easiest purchase and installation experience – and don’t mind shelling out the cash – the Go Power Weekender will likely meet your needs.
Most Portable RV Solar Panel Kit
ACOPOWER Portable Solar Panel
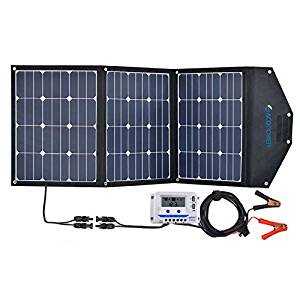
- Panel type: Soft-sided folding panel, monocrystalline
- Available Sizes: 80 watts, 120 watts
- Includes: panel, charge controller, wiring
Changing gears a bit, let’s take a look at the ACOPOWER Portable Solar Panel Kit. Unlike the kits above, this kit is ultra-portable. It switches out the heavy glass and aluminum of the solar panels above, opting instead for a light fabric case that can be folded down for easy storage and setup. The 120 watt panel only weighs 8.3 pounds – that’s about 1/3 of a conventional 100 watt panel!
With the solar panels unattached to your vehicle, this gives you free range to park wherever you want – even in full shade – and simply place the solar panels wherever you want. It’s the best of both worlds. You stay nice and cool while your panels do the hard work for you. Of course, you’ve also got to setup and breakdown the system each time you move, which can certainly get annoying.
The solar panels come with pre-attached arms in the back for easy setup, though at least one reviewer recommends to place rocks on the arms in heavy wind so they don’t blow away.
With a 10 amp charge controller, this kit isn’t designed to handle additional solar panels, so if you’re looking to go bigger in a year or two, this really doesn’t make sense for you.
Also, remember that, while the solar panels are portable and can be stored away, you’ll likely want to install the charge controller somewhere in the RV (probably in the electrical cabinet near the batteries) and have a way to run the cables out to the panel.
Alternately, you could just use the included battery clamps when it’s time to charge up your battery and just set the controller on a surface next to the battery. And if you don’t permanently attach the controller to your RV, you can easily move the whole kit from one vehicle to another – definitely something you can’t do with a rooftop solar panel!
Purchasers report surprisingly good performance and great build quality, noting that the suitcase-like panel is easy to setup and carry around. If you’re looking for the most portable, lightweight solar solution for your RV – you’ve found it.
Best Folding RV Solar Panel Kit
Renogy Solar Suitcase
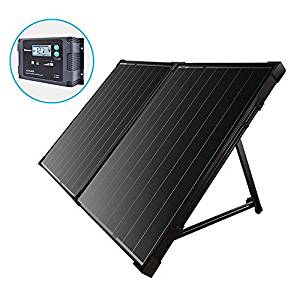
- Panel type: 2-piece rigid folding, monocrystalline
- Available Sizes: 100 watts
- Includes: panel, charge controller, mounting hardware, wiring
Consider the Renogy Solar Suitcase a meeting point between the two kits above. It’s based around a portable solar suitcase similar to ACOPOWER’s kit, but the solar panel is rigid, framed in aluminum and glass instead of fabric. The 100 watt solar panel can be folded in half for easy transport with the handle, then opened up and set in the sun with the included arms on the back.
Probably the coolest part about the Renogy Solar Suitcase? The waterproof charge controller is permanently – and sleekly – attached to the back of the solar panel. No need to worry about where to install the charge controller – it’s already done, making the setup process just that much easier. Put the panel in the sunlight, connect it to the battery, and you’re good to go.
Even with this nice design feature though, you might be wondering why you’d want to buy a glass-and-metal portable solar panel when there’s lighter options available. At almost 30 pounds, Renogy’s solar suitcase is about 3x heavier than the ACOPOWER panel above.
But consider how much more durable the former materials are and you’ve got your answer. This panel can be banged up, left in the rain, left in the blazing sun, day after day, and still keep kicking.
Customers praise the Renogy’s build quality and performance, with many noting it’s a great intro into RV solar – easy to install and easy to use.
The charge controller can handle 20 amps, so you’ve got the capacity to add an additional panel, but it looks like Renogy discourages this as the panel is hardwired to the controller. So again, if you’re looking to beef up your system later down the line, this isn’t the kit for you. However, if you’re looking for a durable, portable one-and-done kit, Renogy’s Solar Suitcase can certainly cover your needs – and in one sleek package.
These folding kits are great if you’re looking to keep your batteries charged up on your infrequent boondocking trips. A few weekend trips to the mountains perhaps. However, if you’re going to be regularly off-grid, you’ll likely need something you can scale up.
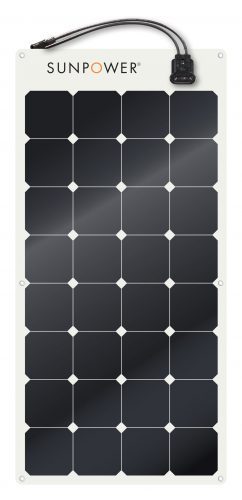
Best Flexible RV Solar Panel Kit
Sunrise RV Kit
Check the Sunrise RV Kit Price at Wholesale Solar
- Panel type: Flexible roof-mounted monocrystalline
- Available sizes: 100 watts
- Includes: panel, charge controller, wiring, temperature sensor
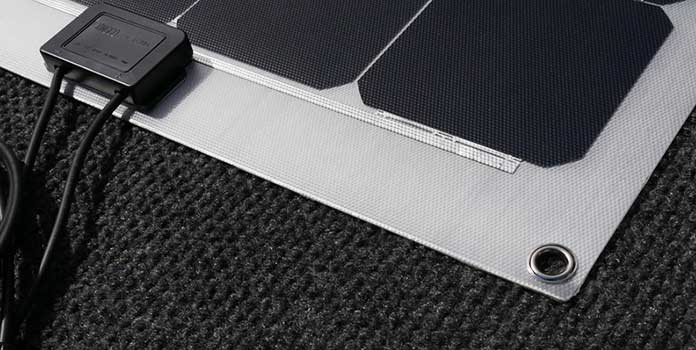
Flexible solar panels are super cool. They lack the rigid aluminum frame and tempered glass of conventional panels, instead using a lightweight polymer that allows the panel to flex back and forth.
Because these panels are so lightweight and flexible, they can be permanently glued down to a curved surface – the roof of your RV for example – without any mounting hardware, saving weight and putting less strain on (and holes in) your vehicle. (In fact, without any glass or metal to provide support, they must be attached to a rigid structure for stability).
As the solar panels are attached flush to the roof, you’re also going cut a more aerodynamic profile when driving down the road, theoretically saving you some gas money as well. So better MPG, no holes in your roof, and a cleaner aesthetic. What could go wrong?
First off, flexible panels are typically around 50% more expensive than their rigid counterparts. Next, as they aren’t covered in glass, at least one user reports some gouging and scraping from low hanging branches on their flexible panel RV setup.
Lastly, you need a smooth surface to glue the panel down. If you’ve got it, great. If you have ridges on your roof, flexible solar panels simply aren’t going to work for you. You’ll have to go with a rigid solar panel with mounting hardware or a portable setup.
Solar retailer Wholesale Solar has put together a pretty sweet solar RV kit using Sunpower’s flexible solar panels, which they’ve dubbed the Sunrise RV Kit. You’ve got the capacity to add another panel or two, as the kit includes a high-quality 30 amp PWM charge controller from Morningstar, along with a temperature sensor and necessary wiring. To complete the system, you’ll need to purchase the controller-to-battery wiring as well as the necessary fuses.
There aren’t too RV solar kits that include flexible solar panels, so if your mind’s already set, you’ve got limited options. Thankfully, this kit takes the cake.
What Should You Consider When Buying an RV Solar Kit?
Price, size, and equipment are all crucial components to consider when looking at RV solar kits, but you also need to be aware of the company and its customer reviews. Even if you get a once-in-a-lifetime deal on your kit, but your panels stop working a year later, is it really that good of deal? Probably not.
Before you even begin looking at actual solar kits and manufacturers though, take a second and ask yourself what your goal is. Do you want your solar installation to provide all your electricity – without shore power at all – so you can use all your electrical appliances whenever you feel like it? If so, a large installation with several solar panels will probably fit the bill. On the flip side, maybe you want a small solar installation to cover your electricity needs when you’re boondocking without electrical hookups for a few days a year. In that case, a small solar installation – a panel or 2 – will probably be enough to tide you over in relative comfort.
Before moving forward, have a clear goal in mind. Write it down so you can always refer back to it. This will help you decide what RV solar kit is best for you.
Just like any investment, you need to do your homework regarding the brands you are looking at. Manufacturers of smaller, RV-sized solar panels aren’t as well known as the big boys like Samsung, SolarCity/Tesla, and LG.
Instead, you’ll hear names like Grape Solar, AM Solar, and Windy Nation. Many of these companies – like the ones above – are legitimate companies with great reputations. But if you’re searching on Amazon and find a great deal from a company you’ve never heard of, with no reviews and no website, it’s probably best to stay away.
No matter the manufacturer, don’t just look at cost (which of course is important), but also warranty details and online reviews of their products. Warranties for solar panels can range from a scant 12 months to a full 10 years, so it pays to find the warranty info before purchasing – it could save you some headaches down the line.
If you can’t find any warranty information or if it only covers a very short time period, it might be worthwhile to look at other brands. Solar panels are fairly simple – they don’t have any moving parts – so you shouldn’t really have any issues. However, as these solar panels are constantly outside on the roof, experiencing rain, snow, heat, and extreme temperature changes, better to be safe than sorry!
And don’t just take the manufacturer’s word that they are the best RV solar panels. What do other customers say about them online? Check out reviews on Amazon, the Better Business Bureau, Facebook, and even Yelp to see what experiences other RV’ers have had.
What equipment comes in RV solar kits?
Some kits include flexible solar panels that can be attached directly to your RV’s roof.
The basic RV solar kit includes:
- Solar panel(s)
- Charge controller
- Mounting hardware to attach solar panel to roof (if necessary)
- Wiring (from solar panel to charge controller, and sometimes charge controller to battery)
Optional equipment that can be included in RV solar kits:
- Inverter
- Transfer Switch (to switch between solar power and shore power while camping)
- Battery (-ies)
Exactly what equipment you need depends on how well set-up your RV already is for solar. RVs are designed to be plugged in to shore power at the campsite and almost all include a converter to convert the campsite’s 120 volt AC electricity to 12v DC to run the fridge, lights, heater, and any other DC appliances. However, that doesn’t really help if you’re installing a solar installation.
Many modern RVs also include many components you need for a solar installation – including the batteries, inverter, transfer switch, and charge controller. All you need to do is plug your solar panel into the integrated input and you’re charging off the sun! If this is your case, you’ve got is easy! All you need to do is buy a solar panel and possibly the right adapter to plug your panels in. Economy models or older RVs might not include solar power equipment, so you’ll be starting from the ground up. While converters are standard equipment, inverters (to change 12v DC coming from the solar panels/battery to AC) aren’t. You’ll have to add one, as well as the charge controller and possibly batteries, along with the solar panels of course. The easiest way to know what equipment you need is to simply look at your owner’s manual and open up your electrical cabinet to see what’s already installed. That’ll give you an understanding of what’s already available, and what your solar kit needs to include.
Let’s take a closer look at the two main pieces of equipment in every RV solar kit: the solar panel and the charge controller.
Solar Panels
Solar panels provide the lifeblood of the solar system. Without them, you’d have no electricity at all! Most of the kits below include a single solar panel rated at 100 to 170 watts, though you can typically add more as you see fit (up to a limit of course). The required wattage of your solar installation really depends on your battery size and electricity use. The bigger your batteries and more you use, the more solar panels you’ll need to charge them in a reasonable time frame.
Speaking generally, if you’ve got a small RV or campervan, a 100 to 200 watt system will likely serve you well. A medium-sized RV will probably be okay with 300 – 600 watts, while larger RVs probably will benefit from 600+ watts of solar panels.
Again though, take the numbers above though as general thoughts. To really size your system appropriately, talk to a professional installer or do the math yourself. Check out our article How Many Solar Panels Do I Need? to begin figuring out how big your solar installation should be.
For RV’s, there are two types of solar panels to choose from: portable and roof-mounted. Which one you choose depends on your needs.
Portable Solar Panels – Portable solar panels are typically stored inside the vehicle and set up in a sunny area when parked. Unlike solar panels mounted on your roof, with portable panels you can park your RV in the shade on a hot day and place the panels in a nearby sunny area, allowing you to be more comfortable inside. The solar panels usually come with arms attached so you can angle the solar panels towards the sun, allowing you to maximize energy production.
The downside with portable solar panels is that you have to take them out and set them up each time you want to go somewhere. One or two solar panels is easy enough, but do you want to set up 5 panels each time you park? Probably not.
Portable solar panels also can’t charge your batteries while you drive – what a waste of sunlight! Because of these downsides, portable solar panels really are only good for RV’s with smaller electricity needs. If you have many electrical appliances, roof-mounted solar panels are probably your best bet.
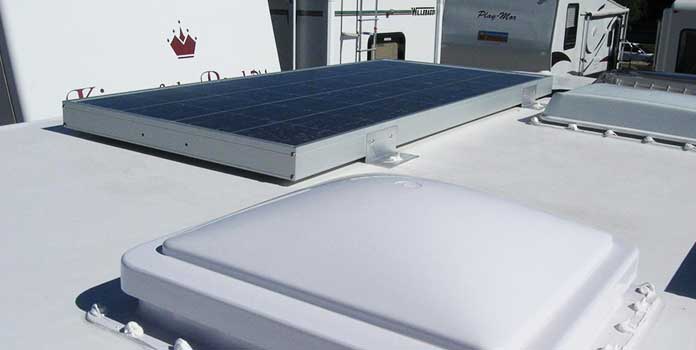
A rigid roof-mounted solar panel. Note the two vents the solar panel must be installed around.
Roof-Mounted Solar Panels – Roof-mounted solar panels are about as easy as you can get. You don’t have to set up anything when you arrive at your campsite. They charge while you drive. You can pretty much install them and then forget them.
The roof of an RV can look pretty cramped once you’re up there, chock full of pipes, an air conditioner, luggage racks, skylights, and awning, so solar panels have to be placed anywhere there’s an open space. Looking at RV solar set-ups is a little like looking at a Tetris game – solar panels placed anywhere they’ll fit!
RV solar panels come in different shapes and sizes. Instead of one large panel, RV owners usually install multiple smaller narrow 100-watt panels or 100-watt square-shaped panels, or smaller rectangle-shaped panels. Often finding the right solar panel is simply a matter of finding the solar panel that fits your roof the best.
You can install as many solar panels on your roof as space (and system capacity, more on that later) allows, which is great if you use a lot of electricity. With roof-mounted solar panels, you can charge your leisure batteries while driving and, when you finally park, it’s easy to use your panels – just turn on your gadgets and go!
Roof-mounted solar panels do have their downsides, though. First, if you want your solar panels to produce electricity, you have to park in full sun. This means it could get pretty stuffy inside. Also, since the solar panels are mounted flat to the roof, you can’t adjust the angle to maximize production, so your solar panels are never going to produce quite as much as they could if they were angled towards the sun.
However, even with these drawbacks, attaching solar panels directly to the roof is a good option since you can install as much as your roof allows and using them is quite easy. Once installed, you are good to go!
Charge Controller
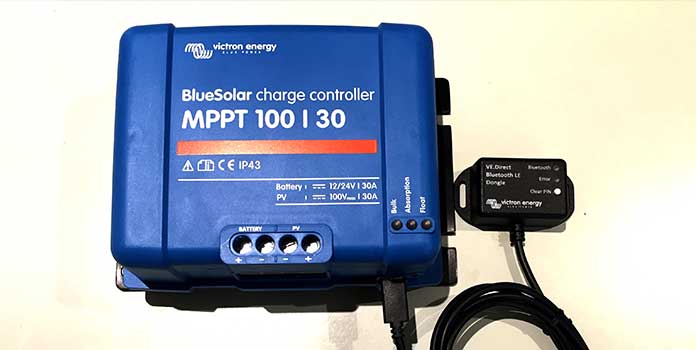
A Victron Energy charge controller with Bluetooth dongle. Check out the AM Solar kit below for more info.
The charge controller is the equipment installed between the solar panel and the battery. As the name suggests, it controls the amount of electricity flowing from the solar panel to the battery, preventing overcharging and permanently damaging your battery. It also prevents electricity flowing in the opposite direction at night, draining your batteries when the sun’s not out (known as reverse current). It’s a necessary component in any off-grid solar installation and all RV solar kits include one.
For an RV set-up, choosing a charge controller is a pretty simple decision – pretty much any will do the job. However, different kits offer different capacity and abilities. The most basic versions simply control the electricity going to you battery – and nothing more. However, the nicer models have an LCD screen that gives information on battery charge and production – some even have Bluetooth to connect to your phone!
Let’s run through the most important considerations when looking at charge controllers:
Size – Most of the RV solar kits below include a 10 amp, 15 amp, or 20 amp controller – though Victron’s kit below includes a rocking 50 amp controller! Certainly overkill for a small system. A single 100 watt solar panel produces about 5.5 amps, so if you’re only installing one panel, a 10 amp controller will work just fine. However, if you plan to add an extra panel or two – bumping your system up to 200 or 300 watts – you’ll need a larger charge controller.
Figuring out how big your controller needs to be is easy. Just find the total amperage of the solar panel(s) you’ll use (check the spec sheet for this data) and choose the next highest-up charge controller. For example: You’ll install two (2) 170 watt panels each producing 9.5 amps, for a total of 19 amps. So you’d need at least a 20 amp controller. Easy. Done. Moving on.
Temperature Sensor – You’ll notice that a couple of the kits below include a temperature sensor for the charge controller to keep tabs on the battery’s temperature. We all know hot and cold weather affects batteries. If you’ve ever camped during the winter, you might remember how you can warm up your flashlight’s batteries in your hand for a couple extra minutes of power.
Solar batteries are the same. During cold weather, your battery’s max voltage decreases. When it’s hot, your battery’s max voltage increases.
Temperature sensors allow your charge controller to compensate for temperature swings throughout the year, preventing overcharging in the summer and undercharging in the winter. Most experts recommend installing a temperature sensor if your batteries will be subject to 20 degree F+ temperature swings over the course of a year.
MPPT vs PWM – These letters probably don’t mean much, and that’s totally okay. We’re not going to get too far into details here, so suffice to say that PWM charge controllers are a cheap, simple piece of equipment for small solar installations. MPPT charge controllers are much more sophisticated and are much more efficient, but cost much more too.
You can pick up a small PWM controller on Amazon for $15, but that same size can run you $150 or more for an MPPT controller.
MPPT controllers do, however, perform better when paired with large systems, in extremely hot scenarios (greater than 212F) and cold temperatures, as well as low light conditions. If that describes your own situation, spending extra cash on an MPPT controller might make sense, but probably not as RV systems are usually very small. All the kits below – save one, the Victron – include PWM charge controllers.
If you want to read up more on the benefits and drawbacks of the different technologies, here’s a white paper from solar manufacturer Victron Energy on this very subject.
Buy RV Solar Panel Components Separately to Save Money
If you’re looking for a set-up that’s quick and easy, the kits above are the way to go. They’re efficient and easy to install, even for those of us who aren’t familiar with solar or electrical work. Buying a kit, you also get the benefit of installation instructions and guidelines for the additional equipment you’ll need, making the process even more simple.
If you want to save some cash though, piecing together your own RV solar kit is certainly possible. It obviously takes more time and planning, but you’re able to choose the equipment to suit your needs and shop around for the best deals. You’ll need solar panels, wiring, and a charge controller just like all the kits above, but don’t forget that you’ll also need mounting hardware, sealants, fuses, additional wiring (3 different kinds: one for panel to controller, one for controller to battery, one for battery to inverter). You’ll need to do quite a bit of research before purchasing your equipment. Start by reading up on sizing your installation, then move on to equipment research, finishing with how to install your system.
Read about the basics of solar panel installation if you want to have a better understanding of how each component works. If you’re wondering how many batteries you need, check out our article How to Make a DIY Battery Bank for Your Solar Panels. You can also check out our post about the best solar panel kits for homes and off grid that may also be suitable for use as RV solar panels kits as well.
No matter if you buy a RV solar panel kit or piece your installation together yourself, with solar on your RV you’ll be pumping out your own free, clean energy while you’re cruising down the highway to your next destination! We hope this article helped you find the best RV solar panel kits for 2018! Let us know what RV solar panel kit you chose in the comments below.