Are Portable Solar Panels for Apartments Worthwhile?

Do you live in an apartment and want to go solar?
Maybe it’s not even the money-saving part of going solar that interests you, but the self-sufficiency or cleaner living that really piques your interest. But, you’ve got a problem. You live in an apartment. You don’t own the roof or the land around it. You don’t have the authority to install solar panels. What to do? Are there options like portable solar panels for apartments?
Thankfully, there’s a few different directions to take if you want to go solar in an apartment. You could work with your landlord and try to figure out a system that works for everyone or you could join a community solar garden.
If those don’t fit your needs, it might be time to look at portable solar panels for apartments. You might not save a lot (or any) money going this route, but it’s certainly fun to produce your own electricity and get out from under the utility, even if just a bit!
There are multiple ways to go solar for apartment dwellers
Let’s take a closer look at all the options you have as a renter to go solar.
Work with your landlord
If your apartment has a nice open roof that’s just begging for some solar panels, strike up a conversation with your landlord! If utilities are included in your rent, there’s already a very good, concrete incentive for her to listen up – she could save quite a bit of money by installing solar.
If you pay for your utilities yourself, this is going to be a harder sell, but it never hurts to ask. With a solar lease, your landlord wouldn’t need to put any money down, they could increase the rent slightly, and your own electricity bill would go down accordingly. A win-win for everyone involved. There’s also the marketing aspect to think about. Who wouldn’t want to live in an apartment fueled by renewable energy?
Buy a community solar plot
If your landlord squashes that dream and you still want to go solar, you still have options. First up, you could join a community solar garden if one’s available. These are specifically designed for those who can’t install solar on their own roofs, be it apartment dwellers, renters, or even homeowners whose roofs are too shaded or small for solar.
A community solar garden is simply a mid- to large-sized solar installation, typically somewhere off in a field. Individuals can purchase ‘shares’ of the installation (8 solar panels, for example). You don’t get to actually use the electricity in your home, since the solar garden is on a random plot of land. Instead, all the electricity goes straight to the electric grid. So what’s in it for you? Well, there’s three benefits:
- First, you’re adding renewable electricity to the grid that wouldn’t otherwise exist. That reduces emissions and contributes to a cleaner planet. Awesome!
- Secondly, you’re compensated by the utility, typically on a $/kWh basis, for all the electricity your share produces and adds to the grid. Those credits can then be used to cover the costs of your own electricity use in your home.
- Lastly, unlike a roof-top installation, if you move, you don’t have to give up your community solar share. This makes community solar an easy long-term investment.
Community solar is growing in popularity. As of 2018, community solar projects exist in 26 states, with four more adding to the mix in the next 2 years.
Install your own panels
Is the thought of joining a community solar garden not really floating your boat? Well, your very last option to go solar in an apartment is to install your own small solar system.
Due to space constraints (you’ll have to fit your panels on places like your patio, balcony, or window still), your system won’t produce nearly as much power as a roof-top or community solar installation. You’ll likely be able to power just a few gadgets for day-to-day use, but if you’re all about green living it will certainly add to your own sense of well-being and enjoyment!
Create a mini off-grid solar system
If you’ve decided you really do want a small solar installation for your apartment and don’t want to involve your landlord, there’s really only one way to go about it legally: create a mini off-grid system to run a few gadgets on.
We’re talking about a system completely separate from your own home’s electricity. You’ll need to install the solar panel(s) outside, send the power to a battery that stores the electricity for later use, then draw from that power while you’re lying in bed watching Netflix.
Depending on your city/county and utility regulations, you could potentially purchase and use a plug and play solar kit — you simply place the installation outside and plug it into an outlet in your house — but this isn’t likely an option. Plus, as a grid-connected system, it’s quite a bit of paperwork to complete just for a single small solar panel that produces a small amount of electricity.
How to add portable solar panels for your apartment

If you’re looking to build a small, portable off-grid system for your apartment, it’s actually a pretty simple endeavor. Here’s an abbreviated step-by-step guide of exactly what you’ll need to do.
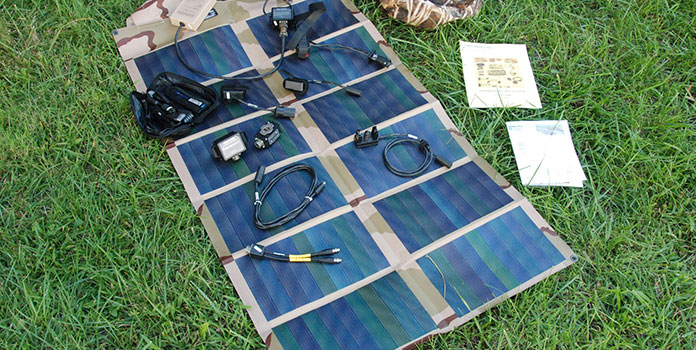
Step 1: Gather materials
First things first, gather your materials. Off-grid solar needs 3 main components: solar panels, a battery, and an inverter. Amazon is a great place to start, as you can find charge controllers and wiring, as well as solar panels, for decent prices. For your battery, it’s best to look locally, as shipping can get quite expensive. Search around on Craigslist or visit a local battery store for a used one in good condition.
Here’s all the components you’ll need:
- Sealed battery –You’ll most likely store your battery inside your apartment so you’ll need the sealed kind, as typical batteries give off harmful gas that you don’t want to breathe in. The larger the better, though 35 to 100 amp-hours should be sufficient for a small system. The best way to decide your battery size is to tally up all your electricity needs, like so:
- 4 9-watt LED bulbs @ 3 hrs/day = 108 watt-hours
- 60-watt Laptop @ 5 hrs/day = 300 watt-hours
- 5-watt Cell Phone Charger @ 8 hrs/day = 40 watt-hours
- TOTAL = 448 watt-hours, or 45 amp-hours (on a 12 volt system). To prolong the life of your battery, you only want to regularly use about 50% of its total capacity, so we’re looking at a 100 amp-hour battery.
- Solar panel – Solar panels come in all sizes. With portable solar panels for apartments, physical size will be the limiting factor, as rooftop panels are about 3 feet wide by 5 feet tall – too big for a window sill. Instead, look at panels around 35 to 50 watts. Our example system above needs 448 watt-hours of electricity per day. In sunny San Diego, that requires a 100 watt solar panel (roughly 2’ X 3’ in size) if you want to recharge the system every day. Experiment with NREL’s PVWatts solar calculator to find the size you’ll need.
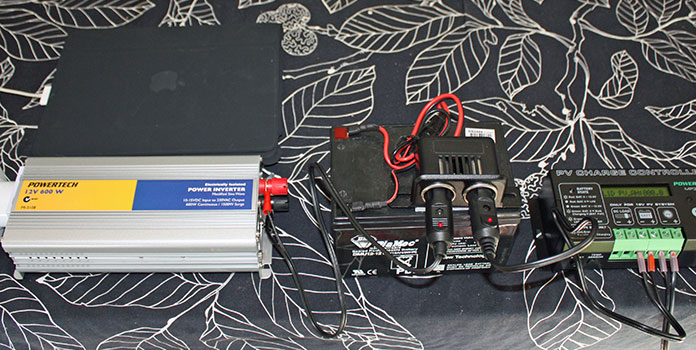
- Inverter – The inverter converts the DC electricity produced by the solar panel to the AC electricity that most of our electronics and appliances need. For our example above, we’d need a 500 watt inverter. Helpful hint: be sure that your inverter can handle 500 watts of continuous power, as some manufacturers advertise an inverter’s ‘peak power’ capacity, which is typically about 2x as high as its continuous capacity.
- Charge controller – The charge controller simply prevents the solar panel from overcharging the battery, ensuring greater lifespan of the system. You can find small versions of these for around $20 on Amazon.
- Wiring – The size of your wiring depends on the size of your solar panel and the amount of electricity that will flow to the battery. The more power that flows or the longer your wire run, the bigger your wires need to be. Here’s a handy chart from Blue Sea Systems on wire size for DC systems.
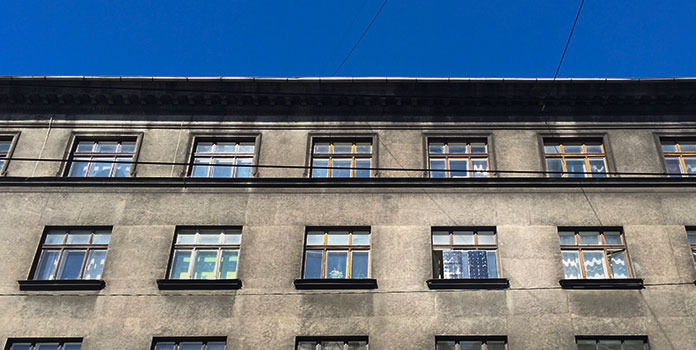
Step 2: Find the best spot for your panel
Now that you’ve got all your equipment gathered, its time to find that perfect spot for your solar panel! In the US, that means facing directly south, tilted perpendicular to the sun for maximum production. Here’s a cool calculator to help you find that perfect tilt angle. You want maximum sun exposure, so watch out for anything could shade your panel – buildings, patios, trees, shrubs, anything at all.
Once you’ve found the perfect spot, it’s time to install it. Solar panels are basically large glass tables set on their sides, so they can easily be blown off a balcony or window sill. To make it safe, you’ll need to bolt it to the floor or wall, preferably at each corner.
Don’t forget that you’ll have 2 wires coming into your house, so you’ll need a way to route them indoors!
Step 3: Find the best spot for your battery and inverter
Once your solar panel is safely secured and ready to go, find a place to put your battery and inverter. You need a designated, out-of-the-way spot for this equipment. As inverter will produce heat, you don’t want it next to your clothes hamper where they might get hidden under old clothes, potentially overheating and creating a hazard.
The best thing to do is purchase or build a designated box that can store your equipment. It doesn’t have to be fancy – even an old ice chest will do the trick in a pinch (in fact, if the cooler’s got wheels, it’s the perfect portable solar system)! Of course, it’ll need to be connected to your solar panels, so don’t forget about that when finding a good spot to put everything.
Step 4: Connect it all together
Here’s the fun part! It’s time to connect all the pieces together! Here’s how everything connects together:
Solar Panels > Charge Controller > Battery > Inverter > Gadgets/Appliances
Like we said, it’s a pretty simple system. Once everything is connected, you can turn on your controller and watch your solar panels charge up your battery!
The ultimate question: Are portable solar panels for apartments worth it?
Okay, so you’re inspired to get some portable solar panels for your apartment. But you’ve got more questions — what about the cost? Will you save money by producing your own power? Let’s run through a scenario to help us figure it out:
Let’s look at our San Diego example again. In this situation, we used about 500 watt-hours a day, so we need a 50 amp-hour battery and a 100-watt solar panel. On Amazon, we can get everything we need for about $400. Here are some options:
This $400 system will produce about 450 watt-hours a day, totaling 162 kWh a year (calculated in PVWatts, linked to above).
Let’s say your system lasts for 8 years (which is about how long lead-acid batteries last). You’re looking at 1,296 kWh over its entire lifetime, all for $400. Is that a good deal? Well, the average electricity price in California is $0.18 per kWh (as of March 2018), which means you’d spend $233 for the same amount of power (1,296 kWh X $0.18) if you purchased it from the utility.
So does it make sense financially? Absolutely not. In the US, we generally have very cheap electricity, and you’d be spending twice as much by constructing your own mini off-grid solar system!
However, there’s more to life than money. Solar also allows you to decrease your own emissions and reduce your carbon footprint. Maybe you just like DIY projects. Maybe you want to be a bit more self-sufficient, or the power goes out at your apartment every time there’s a strong breeze or a clap of thunder. All of these reasons for going solar are just as valid as saving money!
No matter your reasoning or goals, installing solar panels and running your life – even if just a tiny part of it – off of the sun can be such a rewarding project. So get to work! (But be safe.)
If you want to install a bigger solar installation, reach out to a few installers and see what’s available!
Do you live in an apartment and use solar power? How did you go about it? Let us know in the comments below!